Creating End-to-End Tests for a Web App with Cypress
End-to-end testing is an essential phase in the software development process since it ensures that all of a web app’s components are functioning properly. Programmers can create automated tests that simulate real user interactions and validate intended results using this popular testing framework from Cypress. This article will show you how to create end-to-end tests for a web application using Cypress.
Pre-requisites
- Node.js installed
- A source code editor e.g. Visual Studio Code
Initial Setup
Before you start writing tests with Cypress, you need to set up a new Cypress project. To do this, you need to have Node.js installed on your machine. Once you have Node.js installed, follow these steps:
Step 1: Create a new folder for your Cypress project, e.g., cypress-web-test
Step 2: Navigate to the new folder and run the command. This will create a new package.json file for your project.
npm init -yStep 3: Run the following command to install Cypress as a dev dependency for your project. In this example, I’m using the Cypress version 12.9.0 .
npm install cypress --save-devStep 4: Run the following command to install dependencies for generating HTML reports using Allure at the end of our test.
npm install @shelex/cypress-allure-plugin allure-commandline --save-devSetup Test Config and Test Report
After the initial setup described above, you’ll need to perform the following changes on your config files to enable Allure as your test reporter.
Step 1: Create a new file within your project's main directory cypress.config.js and add the following code:
const { defineConfig } = require("cypress");
const allureWriter = require('@shelex/cypress-allure-plugin/writer');

module.exports = defineConfig({
  e2e: {
    setupNodeEvents(on, config) {
        allureWriter(on, config);
        return config;
    }
  },

  screenshotsFolder: 'cypress/reports/screenshots',
  videosFolder: 'cypress/reports/videos'
});
Step 2: Create a new file in the following directory cypress/support/e2e.js and add the following code:
import '@shelex/cypress-allure-plugin';Step 3: Update your package.json file scripts as follows:
"scripts": {
  "test": "npx cypress run --env allure=true,allureResultsPath=cypress/reports/allure-result",
  "generate-report": "npx allure generate cypress/reports/allure-result --clean -o cypress/reports/allure-report && allure open cypress/reports/allure-report"
},
Writing Your First Test
Once you have Cypress installed and configurations implemented, you can create your first test. Create a new file called login.cy.js in the cypress/e2edirectory and add the following code:
describe('Login Page', () => {
  it('Logs in with valid credentials', () => {
    cy.visit('https://www.saucedemo.com/')
    cy.get('#user-name').type('standard_user')
    cy.get('#password').type('secret_sauce')
    cy.get('#login-button').click()
    cy.url().should('include', '/inventory')
    cy.contains('Products').should('be.visible')
  });

  it('Shows an error with invalid credentials', () => {
    cy.visit('https://www.saucedemo.com/')
    cy.get('#user-name').type('standard_user')
    cy.get('#password').type('invalidPassword')
    cy.get('#login-button').click()
    cy.contains('Username and password do not match any user in this service').should('be.visible')
  });
});
In this example, credentials are entered after visiting the login page, the login button is clicked, and then a check is done to see if the right page or error message is displayed. The first test confirms that the user may log in using valid credentials, and the second test confirms that an error message is presented if invalid credentials are entered.
We use the cy.visit command to navigate to the login page, and the cy.get command to select and interact with the login form fields. We use the cy.contains command to verify that the correct text is displayed on the page, and the cy.url().should('include', ...) command to verify that the URL of the page contains the expected text.
Running Your Test (through CLI)
Proceed with the following steps after specifying the scripts in your package.json file.
Step 1: Run the following command to execute your test. Once the test execution is done, you’ll be able to see the test result summary on your terminal. A new folder called reports will be created, containing the test results in JSON format.
npm test
Step 2: To generate and open an HTML report based on the JSON test result file, run the following command:
npm run generate-report
Running Your Test (through Cypress Test Runner)
Besides executing through the CLI, you can also run your tests through Cypress Test Runner with the following steps:
Step 1: Open the Cypress test runner by running the command ./node_modules/.bin/cypress open on a Mac, or npx cypress open on Windows machine. This will launch the Cypress test runner and allow you to create and run tests for your web app.
Step 2: Proceed with the E2E testing configuration and then select a browser.
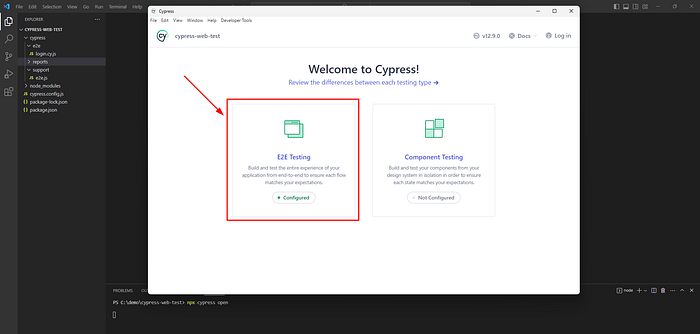
Step 3: Click on your E2E test file to start running the execution.

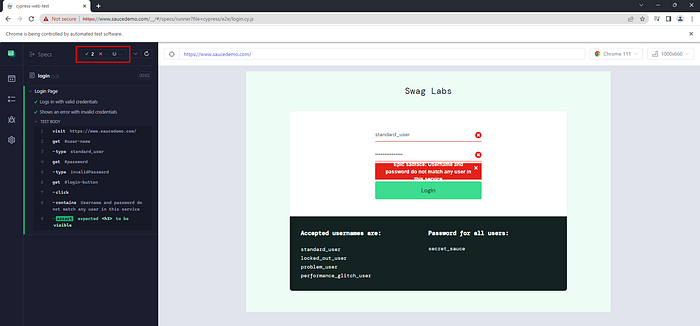
Step 4: Once the test is done, you’ll be able to see the results of your tests as follows.
Conclusion
By simulating user interactions and confirming expected results, end-to-end testing with Cypress is a powerful approach to making sure that your web app is operating as intended. Using Cypress, you can quickly write and run tests for your web application while configuring them to work in various environments and browsers. I hope that this article has helped you get started with Cypress and will allow you to keep discovering all of this robust testing tool’s features and capabilities.