Maximizing the Benefits of Mocha and Chai for API Testing: From Organizing Tests to Generating Reports
As the world becomes increasingly interconnected, Application Programming Interfaces (APIs) are becoming crucial to software development. APIs allow different applications to communicate with each other, enabling seamless data transfer and integration.
However, as APIs grow more complex, it becomes essential to ensure that they function as intended. This is where API testing comes in. By testing APIs, developers can identify bugs, security vulnerabilities, and other issues that might affect the performance of their applications.
One popular tool for testing APIs is Mocha Chai. Mocha is a JavaScript test framework with a simple and intuitive syntax for creating tests. Chai is an assertion library that allows developers to make assertions about the behavior of their APIs.
Together, Mocha Chai offers a powerful and flexible testing framework for APIs. Developers can use Mocha Chai to test everything from simple RESTful APIs to more complex web services.
This article will explore how to use Mocha Chai to test APIs. We will cover the basics of writing API tests with Mocha Chai and provide examples of common test scenarios. By the end of this article, you should have a good understanding of how to use Mocha Chai to test your own APIs.
Pre-Requisites
Setup
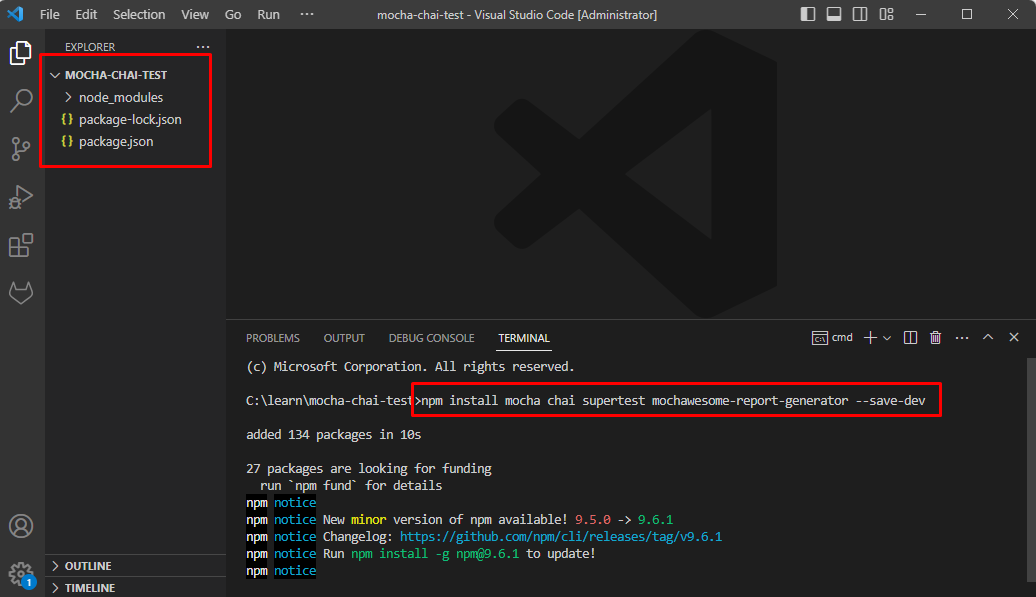
Step 1: Create a project folder
In this example, I’ll create a project folder called mocha-chai-test.
Step 2: Install dependencies
You’ll need to install some dependencies within the project folder to get started. You can do this using npm, the package manager for Node.js. Open a terminal or command prompt and run the following command.
npm install mocha chai supertest mochawesome mochawesome-report-generator util --save-devwith:
- mocha as the test framework
- chai for assertions
- supertest as the library for HTTP assertions
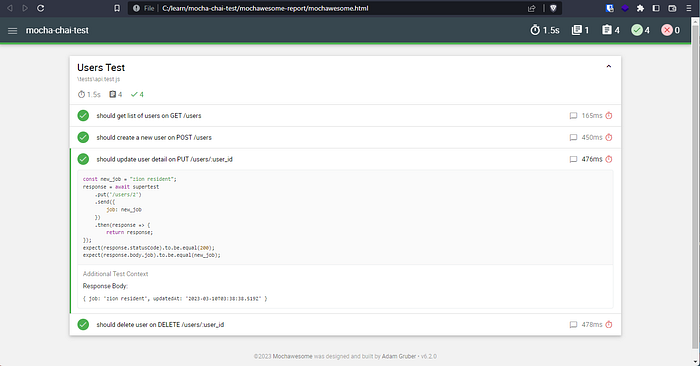
- mochawesome and mochawesome-report-generator will be used to generate a test report in the form of an HTML file
Once installed, the following files will be created in your test folder.
Step 3: Set up a test file
Create a new file called api.test.js (or any other name you prefer) in your project’s test directory. This is where you’ll write your API tests.
Step 4: Write your first test
In your api.test.js file, import Chai, Supertest, addContext, and util.
- As an example, I’ve set the base URL for my APIs as https://my-base-url.in/api
- addContext helper method will be used to associate additional information with a test
- Here I’ve also initiated a response variable that will store the response of each test before passing it for assertion.
const supertest = require('supertest')('https://my-base-url.in/api');
const expect = require('chai').expect;
const addContext = require('mochawesome/addContext');
const util = require('util');
let response;
Then, write your first test.
describe('Test Users', () => {
    it('should return a 200 response on GET /users', async() => {
        response = await supertest
            .get('/users')
            .query({'page': 2})
            .then(response => {
                return response;
        });

        expect(response.statusCode).to.be.equal(200);
        expect(response.body.page).to.be.equal(2);
    });
});
Examples of other requests would look something like this:
- POST request with authorization and custom header
it('should create a new user on POST /users', async() => {
      const name = "morpheus";
      const job = "leader";

      response = await supertest
          .post('/users')
          .set('Authorization', token-goes-here)
          .set('Content-Type', 'application/x-www-form-urlencoded')
          .send({
              name: name,
              job: job
          })
          .then(response => {
              return response;
      });

      expect(response.statusCode).to.be.equal(201);
      expect(response.body.name).to.be.equal(name);
      expect(response.body.job).to.be.equal(job);
});- POST request with file attachment
it('should update user image on POST /users/:user_id/profile', async() => {
    const filepath = "resources/my-image.jpg"
    response = await supertest
        .post(endpoint)
        .set('Content-Type', 'multipart/form-data')
        .attach('image', filepath, { contentType: 'image/jpeg' })
        .then(response => {
            return response;
        });

    expect(response.statusCode).to.be.equal(201);
});- PUT request
it('should update user detail on PUT /users/:user_id', async() => {
    const new_job = "zion resident";

    response = await supertest
        .put('/users/2')
        .send({
            job: new_job
        })
        .then(response => {
            return response;
    });

    expect(response.statusCode).to.be.equal(200);
    expect(response.body.job).to.be.equal(new_job);
});- DELETE request
it('should delete user on DELETE /users/:user_id', async() => {
    response = await supertest
        .delete('/users/2')
        .then(response => {
            return response;
    });

    expect(response.statusCode).to.be.equal(204);
});- Before/After Tests: You can also add other steps that you might want to execute using BeforeEach or AfterEach tests. This example will allow you to log the response body of the API under test to the mochawesome HTML report.
afterEach(function() {
    addContext(this, {
        title: 'Response Body',
        value: util.inspect(response.body)
    });
});
Step 5: Run your tests
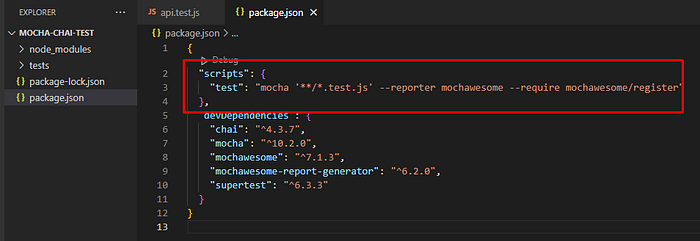
Add the following config within your package.json file
"scripts": {
  "test": "mocha '**/*.test.js' --reporter mochawesome --require mochawesome/register"
},
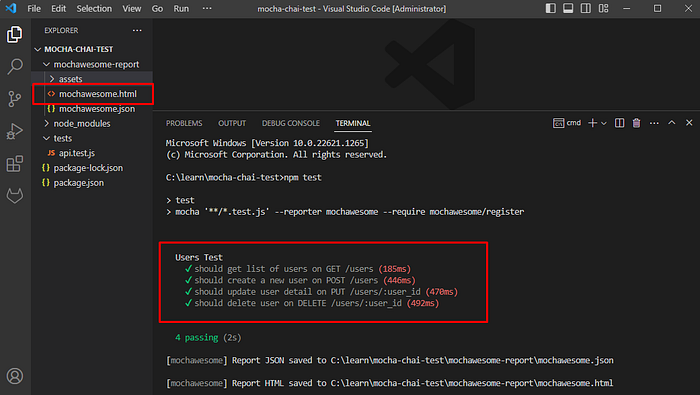
Execute the following command on a terminal or command prompt
npm testThis will allow you to run your test.js files, output the results in the terminal, and generate an HTML report using mochawesome.
Congratulations, you’ve successfully set up API testing using Mocha Chai! From here, you can write more tests to cover different scenarios and ensure the robustness of your API.